

Written by Mo Kahn on
August 7, 2026


You're staring at a rough selfie, a half-finished book cover, or a merch mockup that's close but not quite there, and you don't want to start over from scratch. That's the reason people open a Stable Diffusion image editor. It gives you a way to reshape part of an image, change the mood, or repair a mistake without rebuilding the whole thing, which is exactly why it's become such a practical workflow for creators who need speed and control.
The model's staying power comes from a technical base that was built for scale. Stable Diffusion v1.5 was trained on LAION-5B, a dataset with 5.85 billion image-text pairs, and its U-Net backbone has about 860 million parameters. The system was also designed for fast inference, with reported generation times of about 2 seconds on an A100 GPU and roughly 1.5 to 5 seconds on an RTX 3090 depending on settings and version, which helps explain why editing workflows built on it feel usable instead of academic (Stable Diffusion technical statistics).
A creator usually doesn't open a Stable Diffusion image editor because they want to “use AI.” They open it because a picture is almost finished, and the last stretch is where the time disappears. A selfie needs cleaner skin and softer lighting. A book cover needs atmosphere without losing legibility. A merch mockup needs the graphic to sit on the shirt without breaking the fabric or turning the background into visual noise.
That is why Stable Diffusion matters as an editing surface, not just a generator. Its diffusion pipeline works in latent space, so it can take an existing image, add noise, and rebuild only the parts you want to change while keeping the rest intact. AWS describes that latent representation as 48x smaller than a 512×512 RGB image, and that compression is one reason the editing loop stays practical for rapid iteration (AWS Stable Diffusion overview).
The jobs people ask about over and over are predictable. Selfies need face and hair cleanup. Book covers need mood, composition, and a genre-aware finish. Merch needs a clean object or graphic on a controlled surface. Avatars need identity preserved while the costume, angle, or expression shifts.
Practical rule: choose the edit mode based on how much of the image you can afford to disturb, not on how dramatic the idea sounds.
For a broader map of how these tools are packaged, the guide to AI tools from Shopstar is useful background. If you want a lighter setup, platforms such as starryai wrap upload-and-edit into a simple flow, which is handy when you do not want to install a local stack or manage model files. For background reading on the underlying model, their Stable Diffusion overview is a clean companion to hands-on editing.
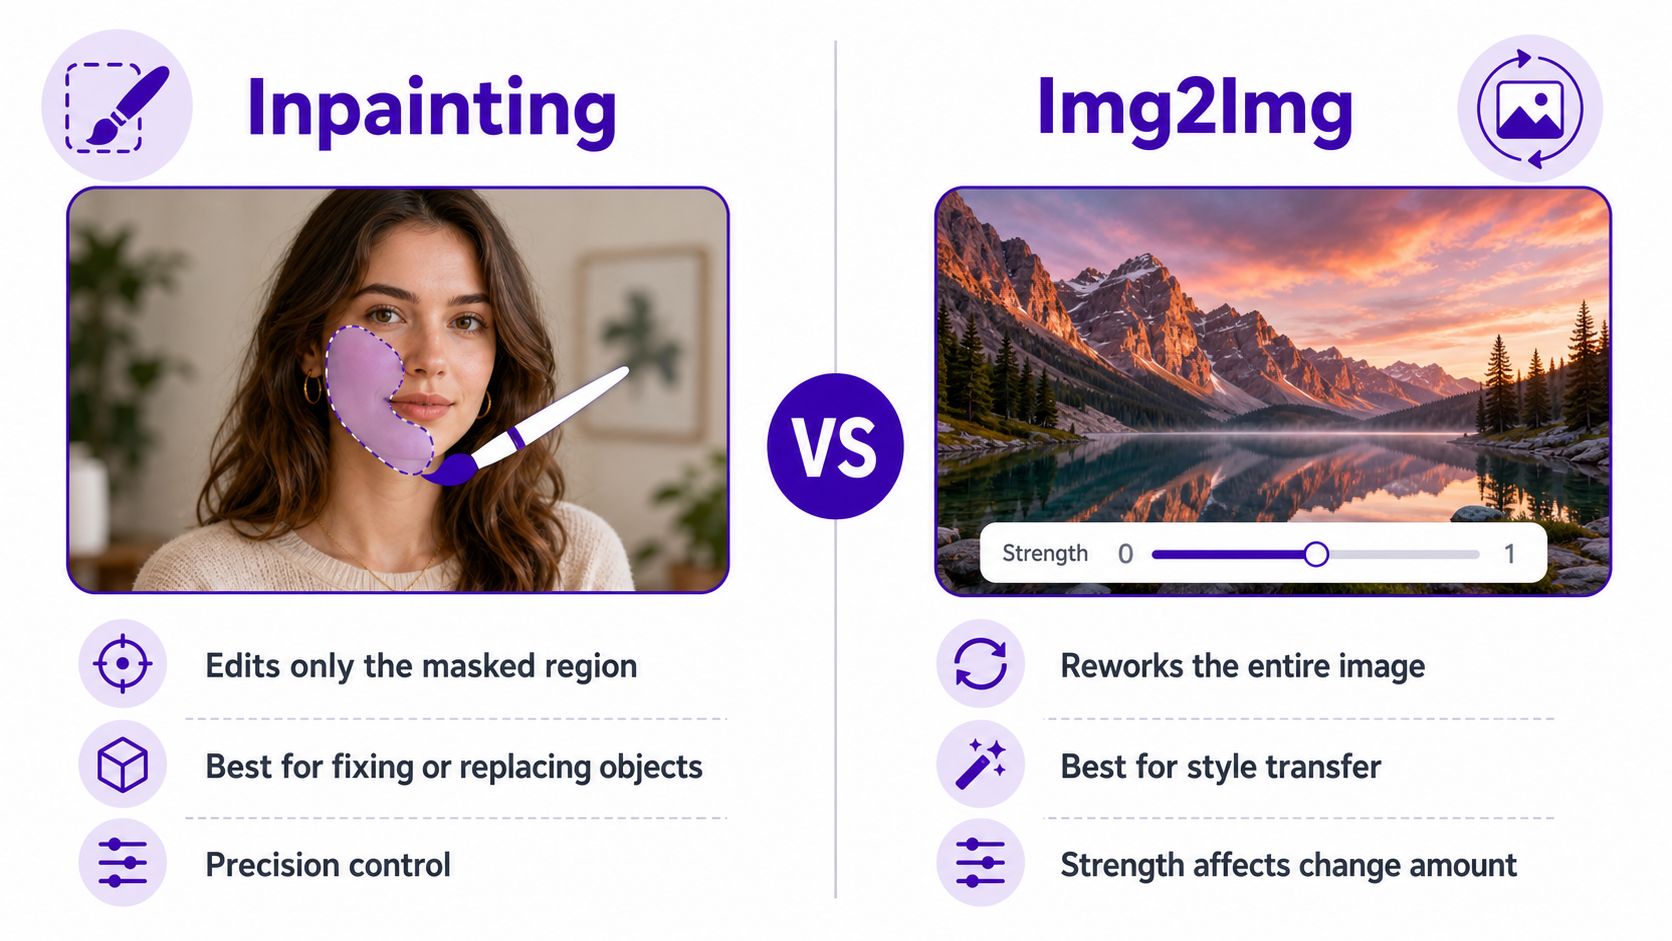
The easiest way to avoid wasted renders is to pick the right mode before you touch a prompt. Img2img keeps the whole image and reworks it at a chosen strength, so it's the mode for style transfer, full-face glow-ups, and sketch-to-finished-image passes. Inpainting keeps everything outside the mask and regenerates only the painted area, which is the better choice when you need to replace a face, change a background object, or fix one specific region.
If you want most of the image to change in mood, use img2img at a moderate strength. If you want only one part to change, paint a mask and inpaint. That single choice prevents a lot of frustration because the model can't “helpfully” rewrite parts of the frame you wanted to preserve.
When people get stuck, it's usually because they ask img2img to do a surgical job or ask inpainting to do a full redesign. A polished headshot with a new haircut can work either way, but a face swap, object replacement, or background fix almost always behaves better with a mask. The reason is simple. Inpainting gives the model a boundary, and boundaries help the denoiser focus.
Keep the edit as local as possible. The smaller the region, the easier it is to preserve identity, layout, and texture.
The same workflow is exposed in tools such as starryai's Edit mode, where upload and edit sit behind a simple interface instead of a local install. For a step-by-step platform walkthrough, their how to use Stable Diffusion guide is a reasonable reference point if you're comparing interfaces rather than setting up your own environment.
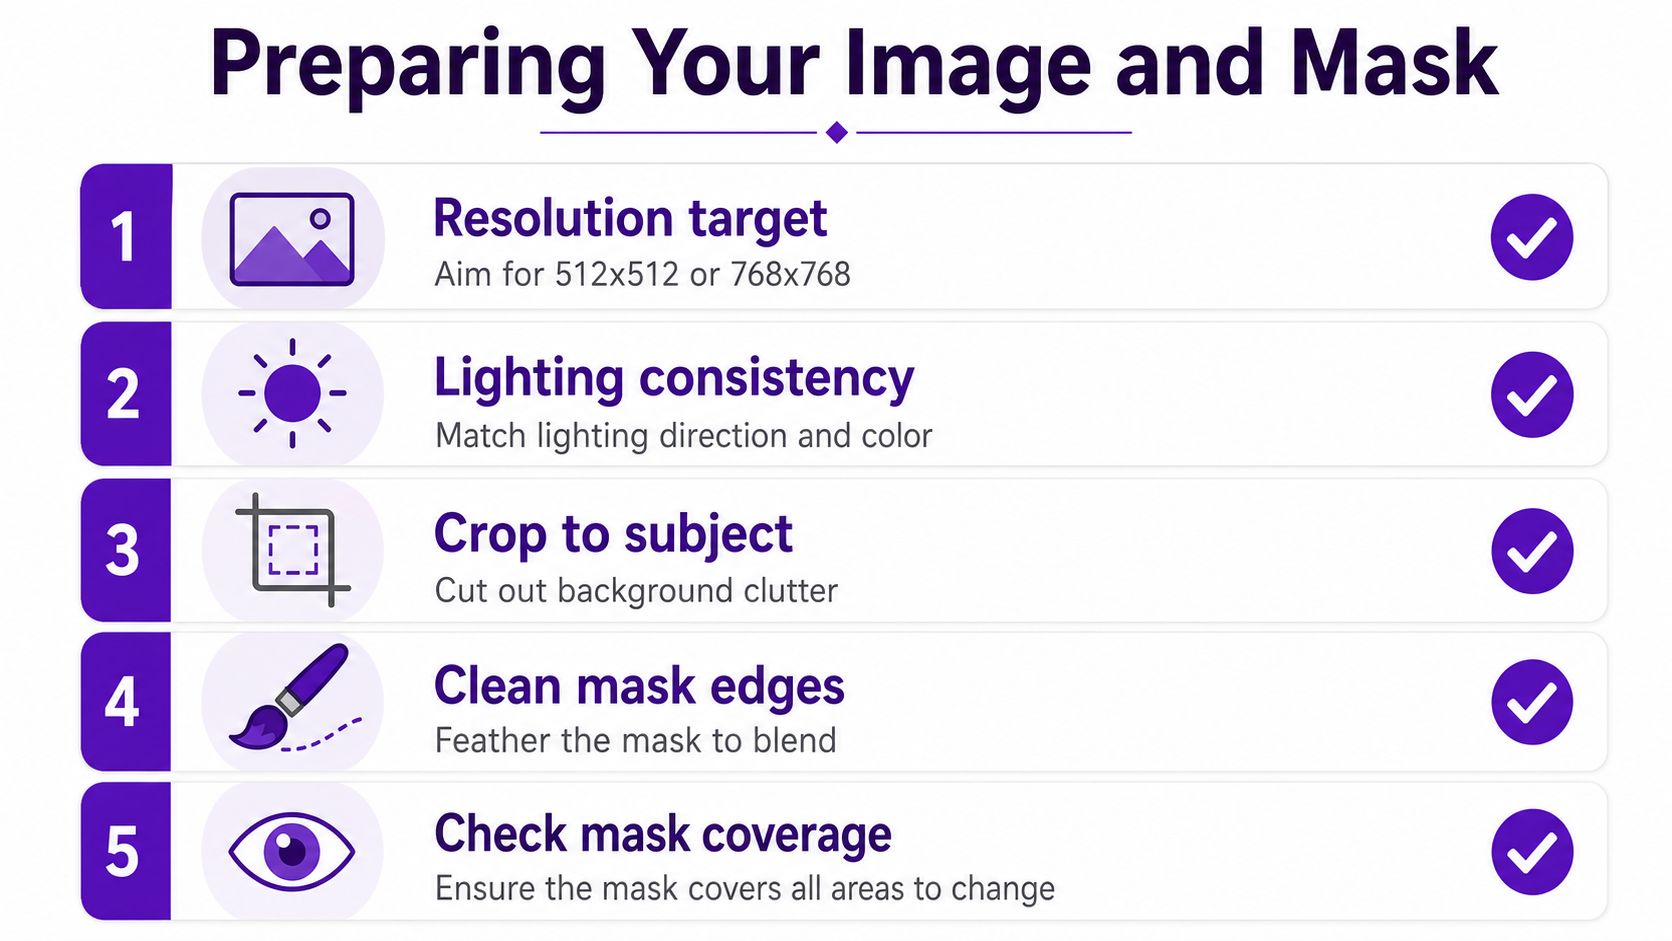
Bad prep creates bad edits faster than bad prompts do. If the source image is noisy, badly cropped, or lit from three directions at once, the model has to guess too much and the output starts drifting. I've had much better results when I crop tightly to the subject, keep the lighting readable, and avoid feeding the editor a cluttered frame unless the clutter is part of the actual change.
The source image should be clear enough that the model can read the subject without fighting compression damage. A lightly sharpened image usually behaves better than a soft, smeared one, and it helps to remove obvious artifacts before editing. If you're editing a face or product, crop in so the model spends its attention on the thing you want to change.
For masks, the rule is equally blunt. Brush masks are more controllable than auto-selection when the region matters, and soft edges usually blend better than hard cut lines. A little mask dilation or blur keeps the transition from looking like a pasted patch, which is where most “AI-looking” edits give themselves away.
Practical rule: start with the smallest mask that still fully covers the change, then feather the boundary so the model has room to blend.
For many face swaps, a denoising strength around 0.4 to 0.6 is a sensible starting point, while subtler restyling usually needs less. Higher strengths are better reserved for full region rebuilds, because stronger noise gives the model permission to rewrite more structure. If you need to isolate the subject before editing, the background remover page is relevant because clean separation is often half the battle.
The biggest prompt mistake in editing is mixing up what belongs to the whole image and what belongs only inside the edit region. Image-level prompts should describe mood, lighting, camera feel, or overall style. Mask-localized prompts should describe what needs to appear inside the painted area. If you ask the model to solve both at once, the output usually becomes vague, overcooked, or oddly literal.
| Job | Positive Prompt Skeleton | Negative Prompt |
|---|---|---|
| Selfie glow-up | clean skin, soft studio lighting, natural facial detail, subtle hair refinement, social media portrait | blurry, plastic skin, extra fingers, watermark, text |
| Cinematic book cover mockup | dramatic lighting, genre-specific atmosphere, centered subject, cover-ready composition, high contrast | random text, watermark, cluttered background, distorted face, low detail |
| Merch graphic | clean vector-like graphic, centered print area, bold contrast, isolated subject, product mockup feel | wrinkles over the design, background clutter, extra objects, watermark, text |
| Fantasy avatar portrait | detailed character portrait, balanced lighting, strong identity, costume detail, fantasy mood | broken anatomy, extra fingers, blurry face, watermark, text |
For a TikTok-style selfie glow-up, keep the prompt tight: “natural facial detail, soft glow, clean skin texture, flattering lighting, realistic hair refinement.” The negative prompt should protect identity and avoid over-smoothing: “blurry, plastic skin, extra fingers, watermark, text.” That combination pushes the editor toward enhancement instead of a completely different person.
For a book cover, the prompt should steer mood and layout, not just style words. Use language like “cinematic lighting, moody atmosphere, central subject, dramatic shadows, cover-ready composition,” then block accidental text with a negative prompt that explicitly says random text. For merch, keep the positive prompt anchored to a clean print surface, and don't forget to exclude background clutter, because design assets look worse when the editor invents detail around the graphic. For an avatar, protect the face and identity first, then add costume language second.
Negative prompts do more work in editing than in pure generation because they defend the parts you're not regenerating. The model doesn't need endless instruction. It needs a fence.
The setting that changes the output most is denoising strength. Lower values keep structure and color closer to the source, while higher values give the model more room to rebuild the image. For editing, that makes strength the first control to adjust when the result feels too literal or too far off.
Speed matters because editing only feels iterative when turnaround stays fast. Reported inference on an A100 GPU is about 2 seconds for a 512×512 image at 50 steps, and a consumer RTX 3090 can handle similar work in roughly 1.5 to 5 seconds depending on version and settings. A peer-reviewed summary also notes that Stable Diffusion can run on most consumer hardware, with a minimum of 4 GB VRAM for 512×512 use (PMC technical summary).
If the edit looks washed out, raise prompt specificity before you raise steps. If the edit is too literal, lower denoising first. If it drifts, the mask or composition is usually the problem, not the sampler.
A selfie edit usually wants inpainting over the face and hair, not a full-frame img2img pass. Keep the mask tight around the skin, fringe, and any problem areas, then use moderate denoising so the expression and identity survive. A prompt like “natural facial detail, soft lighting, clean hairline, realistic portrait” does the job better than a pile of style adjectives.
A book cover works better as img2img when the whole composition needs mood and genre cohesion. Start from the rough mockup, keep the strength moderate, and feed the model a prompt about atmosphere, subject placement, and finish, while the negative prompt blocks random text and clutter. The goal is to keep the cover readable as a cover, not just make it prettier.
Merch is usually a mask-first job. Cut out the printable area, lock the background, and inpaint the graphic or placement details so the garment stays believable. If the shirt texture starts warping around the design, the mask is too broad or the strength is too high.
An avatar often needs a two-pass approach. First use img2img to preserve identity and overall pose, then inpaint costume or expression changes in smaller regions. That split keeps the face coherent while still letting you move the character into a new role.
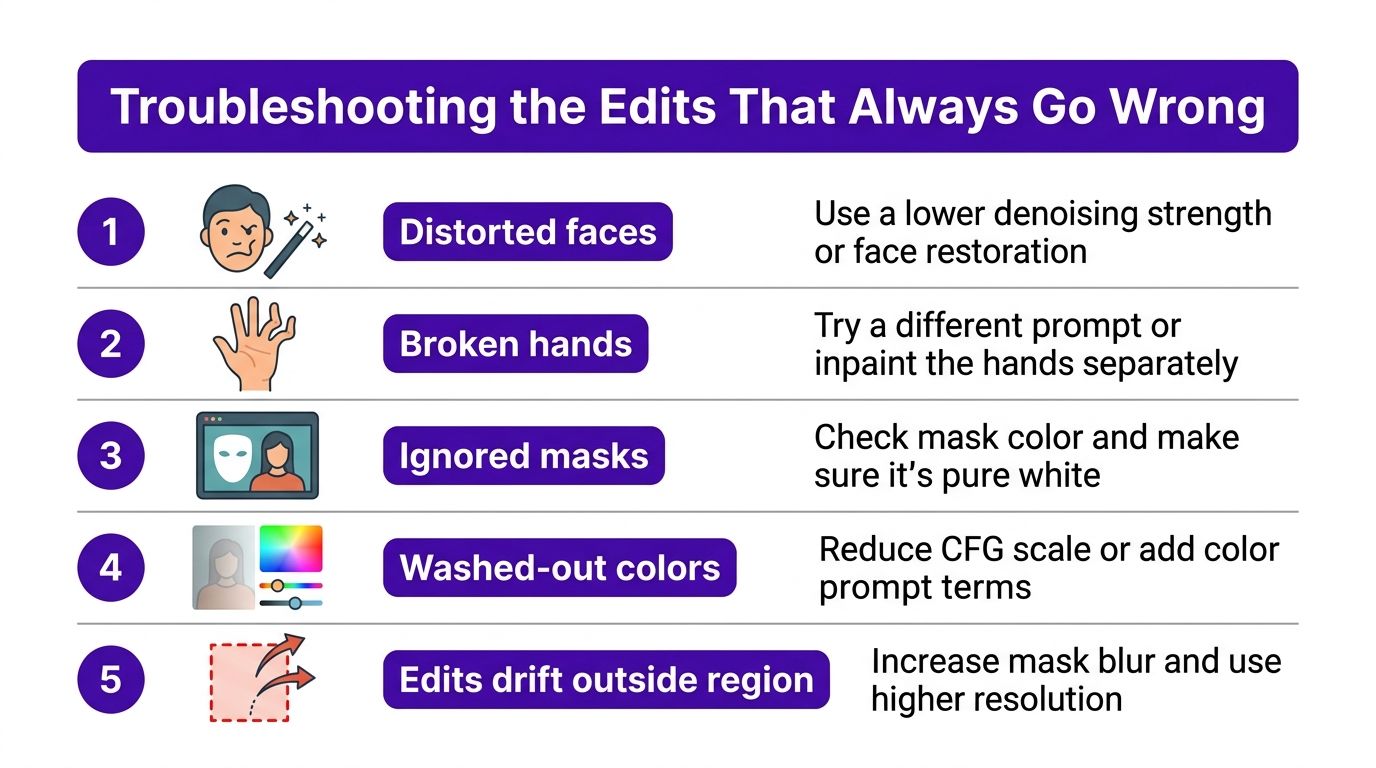
Most failed edits come from mismatched strength, weak masking, or a prompt that's asking for too much at once. When a face warps, hands split apart, or the model ignores the masked area, the fix is usually smaller than people think. I get better results by nudging strength down in small increments than by rewriting the whole prompt from scratch.
Viewpoint control is a separate pain point. Text prompts alone often fail when you need a specific angle, and that's why creators end up using ControlNet, depth maps, pose maps, or a reference image to force composition. If you're trying to keep the same subject coherent across multiple views, the problem isn't just editing one frame, it's maintaining structure while the camera moves.
The safest habit is to keep the original file and work in small strength steps. Rerun the edit with a slightly lower denoising value before you overhaul the prompt, because big jumps tend to erase the parts you already liked. Clear consent matters too when you're editing someone else's face, and platform rules matter once the image leaves your editor. Tools like starryai and similar apps already filter unsafe prompts at the system level, but the final judgment call is still yours.
Mode first, mask second, prompt third, settings last. That order saves time because it attacks the primary cause of most bad edits instead of treating every failure like a prompt problem. Pick one of the four scenarios above, run it once, and use the result to calibrate your own eye instead of spending another hour guessing.
If you want a simple place to test these workflows, starryai gives you an upload-and-edit path that fits this kind of iteration without a complicated setup. Try one selfie, one cover mockup, or one avatar pass, then compare how inpainting and img2img behave on your own images. Visit starryai and start with the edit mode that matches the job you're trying to finish.


.svg)