

Written by Mo Kahn on
July 1, 2026


You've probably done this already. You typed “photorealistic portrait,” hit generate, and got something close but not convincing. The skin looked waxy, the eyes were slightly wrong, the hands felt assembled instead of observed, and the whole image had that polished-but-fake surface that gives AI away.
A realistic AI image rarely comes from one brilliant prompt. It comes from stacking decisions that support realism from the start: choosing the right model style, using a strong reference, writing prompts like a photographer instead of a concept artist, then refining the image until it feels lived in rather than rendered. That's the difference between an output that looks impressive for two seconds and one that holds up when someone pauses on it.
The hardest part of making a realistic AI image isn't getting something detailed. It's getting something believable. Detail alone can still look synthetic if the lighting is too even, the skin too smooth, or the composition too perfect.
That gap matters because people are getting harder to fool, but not by much. A 2024 PMC study found that viewers correctly identified AI-generated images 61.28% of the time, yet still rated them as less realistic than human-made images, with mean realism scores of 3.58 ± 1.326 for AI images versus 4.224 ± 0.949 on a five-point scale. The takeaway is practical. AI can already confuse viewers, but convincing realism still depends on technique.
Practical rule: A good reference photo does most of the heavy lifting. The prompt should refine what the image already knows, not rescue weak source material.
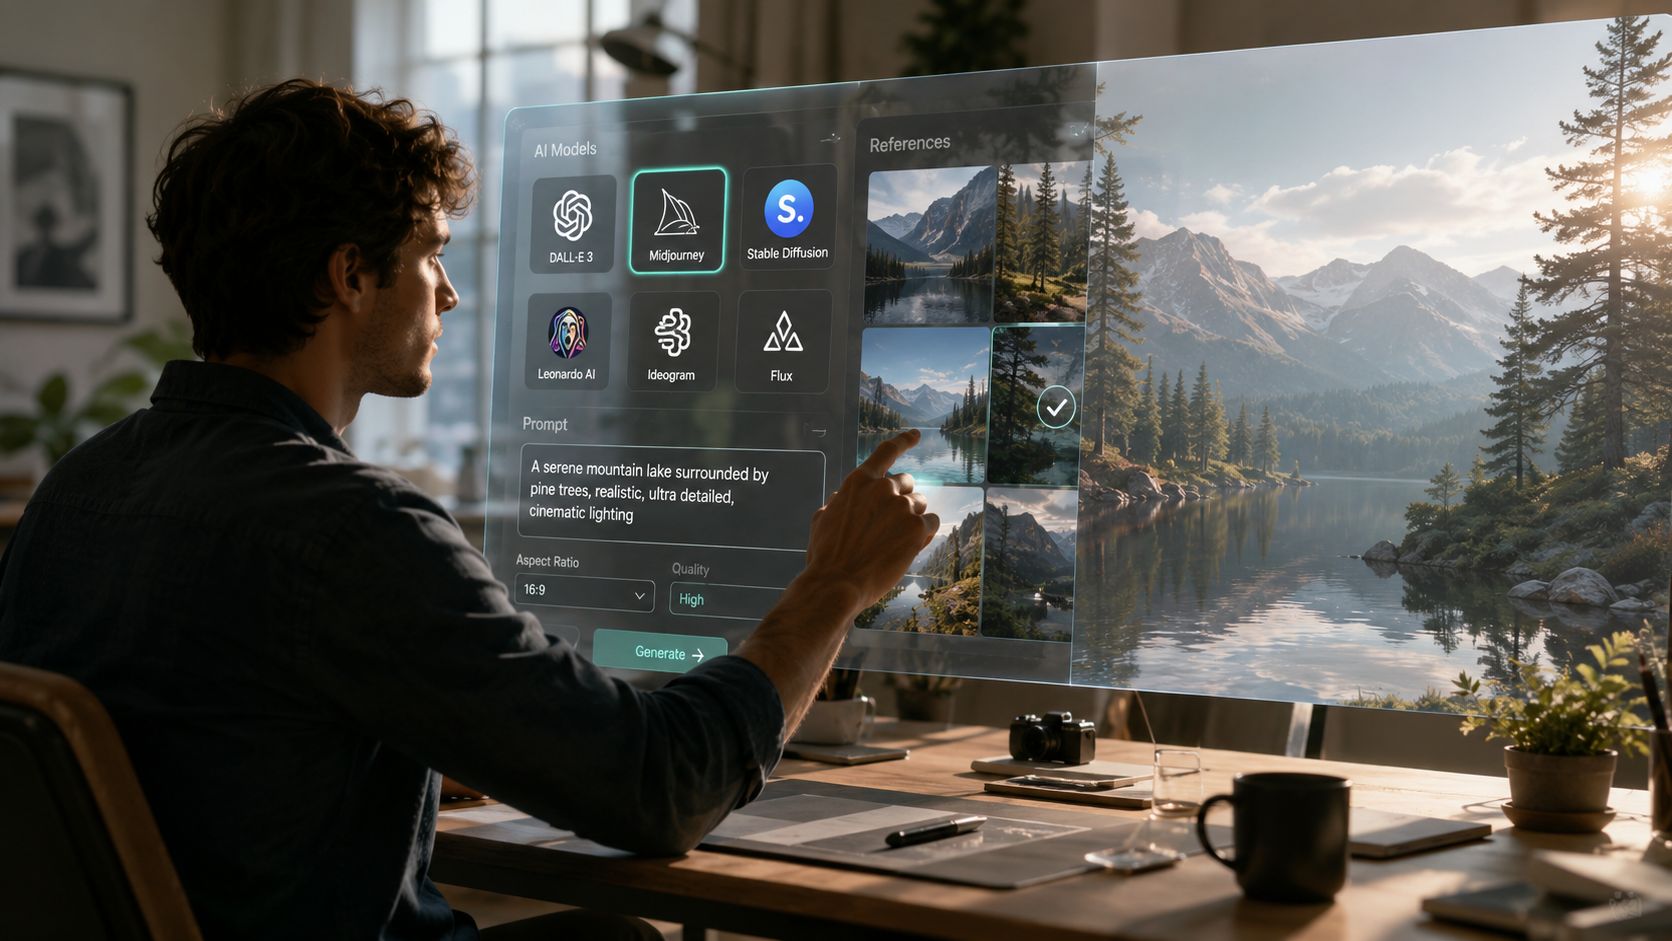
Two inputs matter before you write a single descriptive phrase. First is the model style. If the model is tuned toward illustration, fantasy, or glossy concept art, you'll spend the whole generation fighting its defaults. Second is the reference image, especially for faces, products, and any subject where identity has to stay stable.
The workflow that works is simple. Start with a model aimed at photo output. Feed it a reference that already contains believable structure, light, and texture. Then prompt in layers, not in one dramatic sentence. Realism is less about asking for “ultra realistic” and more about giving the system the same cues a camera would capture naturally.
A lot of beginners try to brute-force realism with adjectives. That usually fails. If the underlying model leans painterly, stylized, or heavily beautified, adding “realistic” ten times won't change its instincts.
Choose a model or preset that already favors photographic behavior. You want outputs that respect skin texture, natural lighting falloff, lens depth, and believable materials. If you're comparing workflows and want a clearer understanding of image transformation approaches, this guide to Stable Diffusion img to img is useful because it shows how reference-driven generation changes the result compared with text-only prompting.
If you want a quick foundation on the model family behind many image workflows, what Stable Diffusion is and how it works gives the basic context without overcomplicating the mechanics.
For portraits, a strong reference beats a clever prompt every time. Use a photo with clean focus, visible facial structure, and light that describes the face instead of flattening it. Window light, open shade, or soft directional indoor light usually works better than harsh mixed lighting from several angles.
Good references tend to share a few traits:
Bad references create bad realism in predictable ways. A blurry selfie often turns into soft, artificial skin. A heavily filtered image produces that plastic finish people associate with weak AI portraits. A low-angle shot with distortion can make every later variation feel subtly off.
Prompting for realism works better when you describe how the image was captured, not just what it contains. Start with the subject, then add concrete capture cues such as lens feel, lighting conditions, framing, and environment.
A simple stack looks like this:
Recent reporting on realism trends notes a move toward plausible, imperfect images rather than flawless ones. Subtle cues like slight motion blur, film grain, or lens flare can make an AI image feel more authentic because they mimic everyday photography rather than studio-clean rendering, as noted in this coverage of how imperfections improve AI image realism.
A prompt should behave like art direction on a real shoot. Subject, location, lens, light, mood, and a few imperfections. Not a pile of hype words.
Start with the structure, not the flourish. Most weak prompts fail because they try to compress everything into one vague sentence. A better prompt reads like a shot brief.
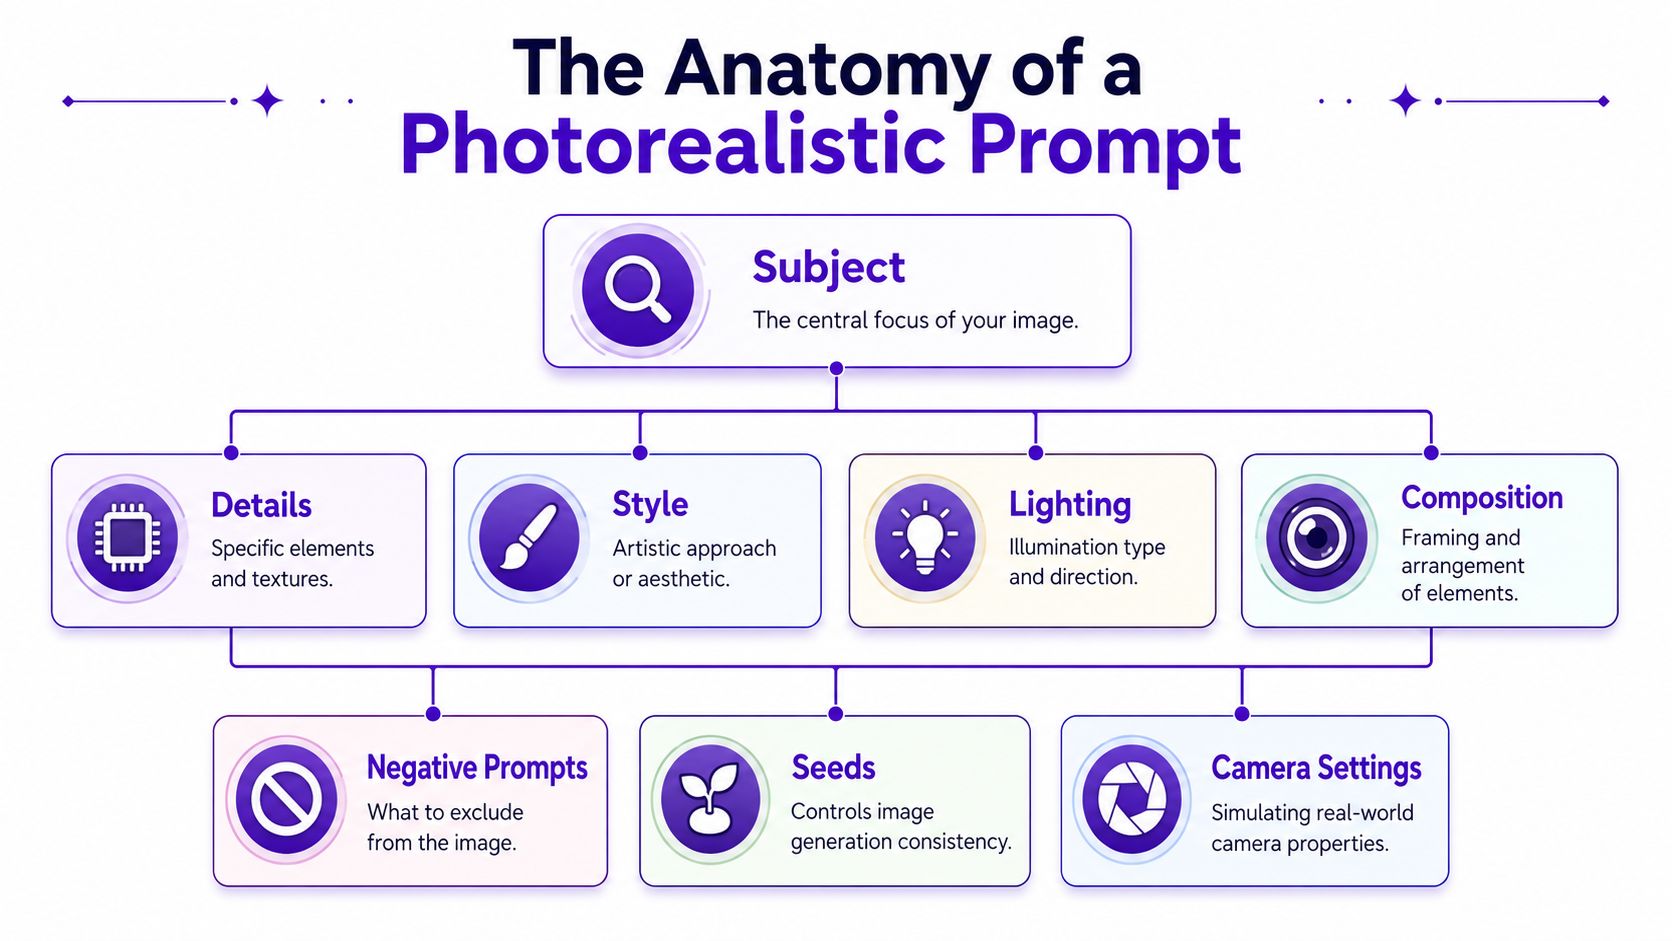
A reliable formula is:
[Subject] + [Detail and context] + [Style and mood] + [Camera and lighting]
That gives the model a hierarchy. It knows who or what matters first, then how the scene should feel, then how the image should be captured.
Here's a plain example:
young man with short curly hair, sitting at a diner booth, tired but calm expression, nighttime street reflections in the window, candid documentary feel, 35mm lens look, on-camera flash, realistic skin texture, slight film grain, soft background blur
That works because each phrase adds a different kind of information. The subject defines identity. The diner booth and reflections create a believable environment. The documentary feel controls the aesthetic. The 35mm and flash language push the model toward photographic choices instead of digital gloss.
Specific camera terms often produce better visual discipline than generic style words. You don't need to mimic a real camera perfectly. You need the prompt to imply physical constraints.
Useful phrases include:
Avoid stacking too many conflicting cues. “Golden hour,” “studio softbox,” and “direct flash” in one prompt usually creates confused lighting. Pick one dominant setup and let the rest support it.
A good visual walkthrough helps here. This short video shows the kind of shot-thinking that improves realism when you move beyond basic descriptors.
One of the biggest mistakes in realistic AI image generation is over-cleaning the scene before it exists. Real photos contain friction. Tiny exposure misses, texture noise, imperfect focus, and subtle lens artifacts make an image feel captured rather than assembled.
Try adding cues like:
Use these lightly. The goal isn't to make the image degraded. The goal is to give it photographic plausibility.
Negative prompts help by removing patterns the model keeps defaulting to. For realism, common negatives are things like over-smoothed skin, extra fingers, distorted eyes, duplicate features, cgi texture, plastic look, and warped background objects.
Seeds matter when you find a composition you want to keep. If one image has the right pose and mood, save that seed and change only one layer at a time. Adjust the lighting phrase. Swap a lens cue. Remove one artifact through the negative prompt. That turns generation from gambling into editing.
“Ultra realistic” is weak direction. “Window light, 50mm portrait, natural pores, slight grain, uneven sweater texture” is usable direction.
The first generation is usually a scouting pass. Treat it that way. You're not hunting for perfection yet. You're looking for one image with the right bones: face shape, pose, atmosphere, and lighting direction.
Say you're trying to turn a clean selfie into a believable editorial portrait. The first prompt might get the mood right but produce over-smoothed skin and eyes that feel too symmetrical. Don't rewrite the whole thing. Keep the seed if the composition works, then narrow the correction.
An iterative pass often looks like this:
That pattern works for more than portraits. Character art benefits from fixed seeds because identity drifts fast when you keep changing prompts. Product images benefit because a stable seed helps preserve shape while you improve materials and reflections.
Different goals need different pressure points. Here are three practical patterns.
A useful habit is to diagnose by category instead of by frustration. If something feels fake, ask why.
| Problem | Likely cause | Better fix |
|---|---|---|
| Face looks waxy | Beauty bias or vague skin language | Add natural pores, fine skin texture, reduce smoothing in negative prompt |
| Scene feels synthetic | Too many style words, no physical light source | Specify one lighting setup and a real environment |
| Product shape drifts | Prompt changes are too broad | Reuse seed and alter one material cue at a time |
In a large study of roughly 287,000 image evaluations from more than 12,500 participants, people correctly distinguished real versus AI-generated images only 62% of the time overall, and AI-generated images were correctly identified 63% of the time in that dataset, according to this arXiv paper on human detection of AI images. That's why tiny glitch-fixing alone isn't enough. Viewers respond to global realism cues like lighting consistency, texture coherence, and overall scene logic.
Templates work best when you treat them as scaffolding, not scripts. Keep the structure. Swap the specifics.
One of the tougher jobs in realistic AI image generation is maintaining the same subject across multiple views. That problem matters for avatars, product listings, book characters, and merch previews because one strong image isn't enough if every new angle changes the face, silhouette, or proportions.
Recent product development around alternate-view generation points to a growing need for consistent multi-angle realism, especially for subjects that must preserve identity across poses and perspectives, as described in this overview of multiple-view image generation.
The practical approach is simple:
| Use Case | Prompt Structure | Example |
|---|---|---|
| Selfie upgrade | [person] + [natural setting] + [flattering but real light] + [camera feel] + [texture cues] + [negative prompt] | woman with shoulder-length brown hair, relaxed expression, standing by a living room window, soft morning light, 50mm portrait lens look, natural skin texture, subtle hair flyaways, shallow depth of field, negative prompt: plastic skin, distorted eyes, extra fingers, cgi look |
| Character portrait | [character identity] + [defining features] + [wardrobe] + [emotional tone] + [environment] + [lens and light] | middle-aged fantasy detective, sharp cheekbones, silver-streaked hair, dark wool coat, observant expression, rainy city alley, cinematic but realistic, 35mm lens, wet pavement reflections, practical streetlight glow, fine skin texture |
| Product photo | [product] + [material detail] + [surface and setting] + [lighting setup] + [camera framing] + [cleanup negatives] | matte ceramic coffee mug, subtle glaze variation, placed on oak table, soft daylight from left, clean commercial product photo, three-quarter angle, realistic shadow under object, negative prompt: warped handle, melted edges, floating object, inconsistent reflections |
After generation, don't stop at the first decent result. Upscale the chosen image, then make small edits to exposure, contrast, white balance, and sharpness. That last pass often does more for realism than another full re-prompt, because you're polishing a strong image instead of re-rolling the entire scene.
A realistic AI image can still fall apart when you zoom in. Edges soften. Texture collapses. Hair becomes clumps instead of strands. That's why the finishing stage matters.
Upscaling is where detail gets clarified for close viewing, cropping, and export. It's especially useful for portraits, product images, and anything meant for print or social posts where people will inspect the image longer than a passing glance.
A dedicated AI image upscaler helps preserve small details that feel flat in a base generation, such as fabric grain, hair separation, skin texture, and edge definition around objects. Use it after you've picked the right composition, not before.
Studio habit: Don't upscale every draft. Choose the image with the strongest structure first, then upscale only the finalist.
Post-processing should be light. If you push too far, you often reintroduce the artificial finish you were trying to avoid.
Keep the final edit to a few moves:
There's also a broader reason to be careful. A 2023 Psychological Science study introduced the idea of AI hyperrealism and found that White AI faces were judged as human more often than actual human faces in an experiment with 124 adults, arguing that AI-generated faces can sit near the perceptual center of face space and seem especially familiar and realistic to viewers, as reported in this study on AI hyperrealism and face perception. The better these images get, the more important it becomes to polish responsibly, not deceptively.
Realism's problem isn't only technical anymore. It's social. If you can make a synthetic portrait feel camera-made, you also take on responsibility for how that image is used, labeled, and understood.
Audiences are learning to question images, but labeling is still uneven across platforms and workflows. That means the burden often falls on the creator. If an image could reasonably be mistaken for a photo of a real person or a real event, clear disclosure is the safer choice.
That matters even more with faces. As noted earlier, AI-generated faces can sometimes read as more human than real ones under certain conditions. Used casually, that can confuse viewers. Used commercially, it can affect trust around advertising, testimonials, profile images, and branded storytelling.
A useful rule is simple:
If you're making merch, social campaigns, cover art, mockups, or client assets, read the tool's usage terms before publishing. Commercial rights vary by platform and plan, and those details affect what you can sell, license, or reuse.
For a practical overview of that question, can you sell AI-generated art is the kind of terms-focused check worth doing before a project goes live. The image itself might be finished, but the usage decision still needs to be deliberate.
Responsible creation doesn't make realism less useful. It makes the work stronger. When viewers know what they're looking at, you keep trust while still using the medium for what it does well: concepting, storytelling, experimentation, and fast visual production.
If you want to turn selfies, text prompts, or reference images into polished visuals without building a complicated workflow from scratch, starryai is one option for generating and refining image ideas quickly. Start with a clean reference, keep your prompts grounded in real camera and lighting cues, and iterate until the image feels believable instead of merely detailed.